目录
- 技术背景
- Docker的基本操作
- 拉取容器镜像
- 编译Tex文件
- Hello World
- 测试公式
- 量子线路图
- 总结概要
- 版权声明
- 参考链接
技术背景
Latex在文档撰写方面是不可或缺的工具,尤其是在写文章方面,是必须要用到的文字排版工具 。但是latex的环境部署并不是一个特别人性化的操作,尤其是在各种不同的平台上操作是完全不一样的,还经常容易报错 。我们可以一个一个地去解决报错问题,但是这需要耗费极大的精力和时间,所以很多人选择了直接在overleaf进行latex的创作 。但其实overleaf也有它的缺点,比如免费版本的带宽和速度都比较受限 , 尤其是在国内的网络,访问速度可谓是”一绝“ 。因此这里我们介绍一个更加人性化的方案,而且对各大平台的兼容性非常都非常好:使用docker来部署latex环境 。Docker的基本操作
在各大平台的官方源里面应该都会有提供docker容器,因此这里我们也不过多的赘述 。作者过去写过一篇关于使用docker来部署MindSpore开发环境的博客,感兴趣的读者可以当作是拓展文章来阅读一下 。首先我们在Manjaro Linux平台上启动docker(在其他平台上的操作可能有区别 , 比如service start docker等):
[dechin-root tex]# systemctl start docker注意上述指令要在root帐号下才能够启动,如果要选择在非root帐号下操作 , docker容器是不支持的,但是我们可以选择singularity这一类似的容器解决方案 , 相关内容可以参考这篇博客 。启动服务之后,正常状态下我们可以看到docker的status是处于active或者running的状态:
[dechin-root tex]# systemctl status docker● docker.service - Docker Application Container EngineLoaded: loaded (/usr/lib/systemd/system/docker.service; disabled; vendor preset: disab>Active: active (running) since Sun 2021-03-28 18:50:47 CST; 7s agoTriggeredBy: ● docker.socketDocs: https://docs.docker.comMain PID: 25366 (dockerd)Tasks: 123 (limit: 47875)Memory: 219.1MCGroup: /system.slice/docker.service├─25366 /usr/bin/dockerd -H fd://└─25378 containerd --config /var/run/docker/containerd/containerd.toml --log-l>拉取容器镜像
首先我们可以访问dockerhub官网搜索一下是否存在我们所需要的容器镜像,比如我们的搜索结果如下: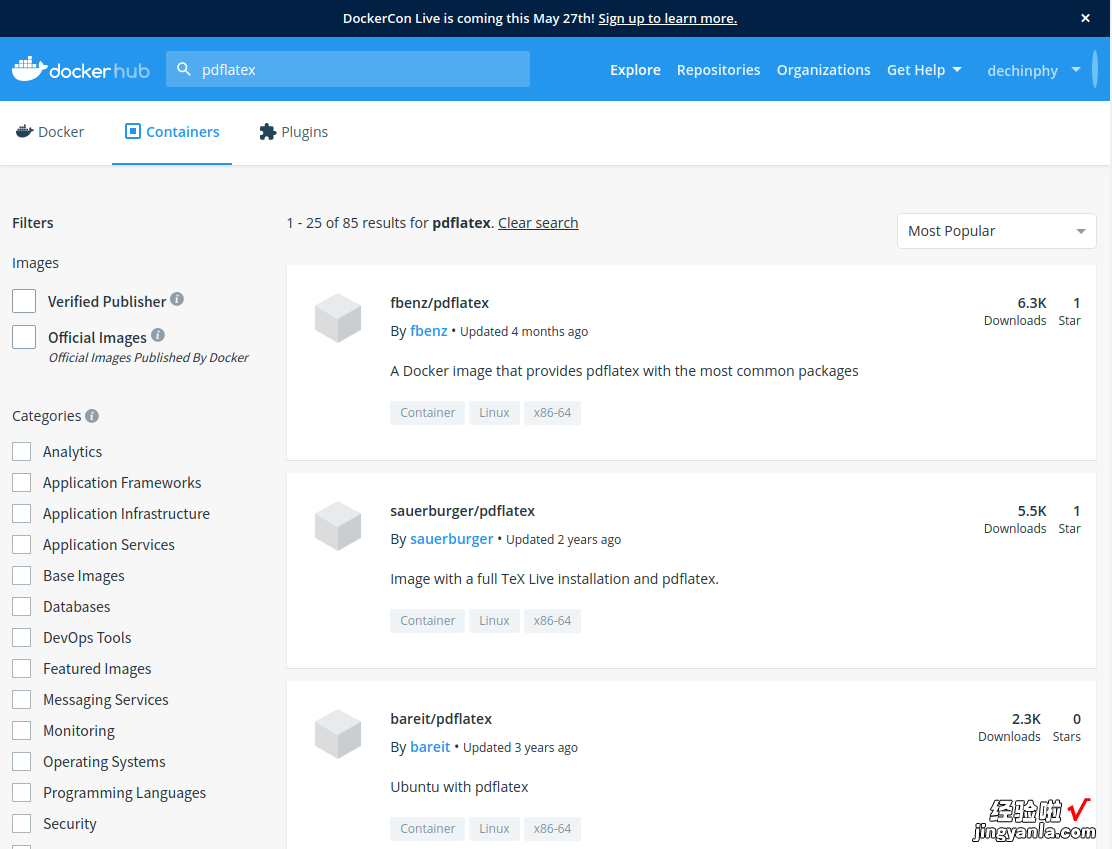
可以看到这里有很多的选项,一般我们可以直接选择星星最高的容器镜像进行下载使用:
[dechin-root tex]# docker pull fbenz/pdflatexUsing default tag: latestlatest: Pulling from fbenz/pdflatexf22ccc0b8772: Already exists 3cf8fb62ba5f: Already exists e80c964ece6a: Already exists 9aa2583757a3: Pull complete 2c3d7890d583: Pull complete Digest: sha256:6ecca11b1a203faed5c0a2ace2a13aac100dd19d7a4e0db0474283bcded3c041Status: Downloaded newer image for fbenz/pdflatex:latestdocker.io/fbenz/pdflatex:latest下载需要一段的时间 。下载完成后,可以在本地镜像仓库中找到刚才下载的这个镜像文件:
[dechin-root tex]# docker imagesREPOSITORYTAGIMAGE IDCREATEDSIZEfbenz/pdflatexlatest8e77427229563 months ago24GB我们可以测试一下这个容器镜像中的pdflatex功能是否正常:
[dechin-root tex]# docker run -it fbenz/pdflatex pdflatex --helpUsage: pdftex [OPTION]... [TEXNAME[.tex]] [COMMANDS]or: pdftex [OPTION]... FIRST-LINEor: pdftex [OPTION]... &FMT ARGSRun pdfTeX on TEXNAME, usually creating TEXNAME.pdf.Any remaining COMMANDS are processed as pdfTeX input, after TEXNAME is read.If the first line of TEXNAME is %&FMT, and FMT is an existing .fmt file,use it.Else use `NAME.fmt', where NAME is the program invocation name,most commonly `pdftex'.Alternatively, if the first non-option argument begins with a backslash,interpret all non-option arguments as a line of pdfTeX input.Alternatively, if the first non-option argument begins with a &, thenext word is taken as the FMT to read, overriding all else.Anyremaining arguments are processed as above.If no arguments or options are specified, prompt for input.-draftmodeswitch on draft mode (generates no output PDF)-encenable encTeX extensions such as mubyte-etexenable e-TeX extensions[-no]-file-line-errordisable/enable file:line:error style messages-fmt=FMTNAMEuse FMTNAME instead of program name or a %& line-halt-on-errorstop processing at the first error-inibe pdfinitex, for dumping formats; this is implicitlytrue if the program name is `pdfinitex'-interaction=STRINGset interaction mode (STRING=batchmode/nonstopmode/scrollmode/errorstopmode)-ipcsend DVI output to a socket as well as the usualoutput file-ipc-startas -ipc, and also start the server at the other end-jobname=STRINGset the job name to STRING-kpathsea-debug=NUMBERset path searching debugging flags according tothe bits of NUMBER[-no]-mktex=FMTdisable/enable mktexFMT generation (FMT=tex/tfm/pk)-mltexenable MLTeX extensions such as charsubdef-output-comment=STRINGuse STRING for DVI file comment instead of date(no effect for PDF)-output-directory=DIRuse existing DIR as the directory to write files in-output-format=FORMATuse FORMAT for job output; FORMAT is `dvi' or `pdf'[-no]-parse-first-linedisable/enable parsing of first line of input file-progname=STRINGset program (and fmt) name to STRING-recorderenable filename recorder[-no]-shell-escapedisable/enable write18{SHELL COMMAND}-shell-restrictedenable restricted write18-src-specialsinsert source specials into the DVI file-src-specials=WHEREinsert source specials in certain places ofthe DVI file. WHERE is a comma-separated valuelist: cr display hbox math par parend vbox-synctex=NUMBERgenerate SyncTeX data for previewers according tobits of NUMBER (`man synctex' for details)-translate-file=TCXNAME use the TCX file TCXNAME-8bitmake all characters printable by default-helpdisplay this help and exit-versionoutput version information and exitpdfTeX home page: Email bug reports to pdftex@tug.org. 当我们看到help指令运行成功时,就表明容器镜像可以正常使用 。使用容器还有一点需要注意的是,如果我们直接用docker run -it fbenz/pdflatex的话 , 没有绑定本地的目录,这样是无法看到本地所撰写的tex文件的 。因此我们一般需要在运行的时候加上-v的选项来绑定本地的目录,基本使用方法是:-v 本地目录:容器目录,注意需要使用绝对路径,不能使用相对路径 。
编译Tex文件
在上述章节中完成基于docker的pdflatex环境部署之后,我们可以开始撰写一些简单的tex文件用来测试一下环境 。Hello World
首先最简单的我们测试一个hello world的案例,仅在pdf文档中输出一个Hello World!的字样,具体tex代码如下:[dechin@dechin-manjaro tex]$ cat hello_world.tex documentclass{article}begin{document}Hello world!end{document}使用方法也不难,首先我们运行docker容器,注意需要绑定一个本地路径,然后进入到容器内对应的目录下:
[dechin-root tex]# docker run -it -v /home/dechin/projects/2021-python/tex/:/home/ fbenz/pdflatexroot@d7ed2229a244:/# lltotal 72drwxr-xr-x1 root root 4096 Mar 28 11:07 ./drwxr-xr-x1 root root 4096 Mar 28 11:07 ../-rwxr-xr-x1 root root0 Mar 28 11:07 .dockerenv*drwxr-xr-x2 root root 4096 Nov 19 13:09 bin/drwxr-xr-x2 root root 4096 Apr 242018 boot/drwxr-xr-x5 root root360 Mar 28 11:07 dev/drwxr-xr-x1 root root 4096 Mar 28 11:07 etc/drwxr-xr-x2 1000 1000 4096 Mar 28 04:43 home/drwxr-xr-x1 root root 4096 May 232017 lib/drwxr-xr-x2 root root 4096 Nov 19 13:09 lib64/drwxr-xr-x2 root root 4096 Nov 19 13:07 media/drwxr-xr-x2 root root 4096 Nov 19 13:07 mnt/drwxr-xr-x2 root root 4096 Nov 19 13:07 opt/dr-xr-xr-x 323 root root0 Mar 28 11:07 proc/drwx------2 root root 4096 Nov 19 13:09 root/drwxr-xr-x1 root root 4096 Nov 25 22:25 run/drwxr-xr-x1 root root 4096 Nov 25 22:25 sbin/drwxr-xr-x2 root root 4096 Nov 19 13:07 srv/dr-xr-xr-x13 root root0 Mar 28 11:07 sys/drwxrwxrwt1 root root 4096 Nov 28 18:34 tmp/drwxr-xr-x1 root root 4096 Nov 19 13:07 usr/drwxr-xr-x1 root root 4096 Nov 19 13:09 var/root@d7ed2229a244:/# cd home/root@d7ed2229a244:/home# lltotal 12drwxr-xr-x 2 1000 1000 4096 Mar 28 04:43 ./drwxr-xr-x 1 root root 4096 Mar 28 11:07 ../-rw-r--r-- 1 1000 100069 Mar 28 04:43 hello_world.tex我们看到在容器内的目录下也能够看到这个tex文件 , 说明路径的绑定成功地执行了 。运行指令很简单,直接在docker容器内运行pdflatex your_file.tex即可:
root@d7ed2229a244:/home# pdflatex hello_world.tex This is pdfTeX, Version 3.14159265-2.6-1.40.18 (TeX Live 2017/Debian) (preloaded format=pdflatex) restricted write18 enabled.entering extended mode(./hello_world.texLaTeX2e <2017-04-15>Babel <3.18> and hyphenation patterns for 84 language(s) loaded.(/usr/share/texlive/texmf-dist/tex/latex/base/article.clsDocument Class: article 2014/09/29 v1.4h Standard LaTeX document class(/usr/share/texlive/texmf-dist/tex/latex/base/size10.clo))No file hello_world.aux.[1{/var/lib/texmf/fonts/map/pdftex/updmap/pdftex.map}] (./hello_world.aux) )Output written on hello_world.pdf (1 page, 11916 bytes).Transcript written on hello_world.log.root@d7ed2229a244:/home# lltotal 32drwxr-xr-x 2 1000 10004096 Mar 28 11:08 ./drwxr-xr-x 1 root root4096 Mar 28 11:07 ../-rw-r--r-- 1 root root8 Mar 28 11:08 hello_world.aux-rw-r--r-- 1 root root2408 Mar 28 11:08 hello_world.log-rw-r--r-- 1 root root 11916 Mar 28 11:08 hello_world.pdf-rw-r--r-- 1 1000 100069 Mar 28 04:43 hello_world.texroot@d7ed2229a244:/home# chmod -R 777 .root@d7ed2229a244:/home# lltotal 32drwxrwxrwx 2 1000 10004096 Mar 28 11:08 ./drwxr-xr-x 1 root root4096 Mar 28 11:07 ../-rwxrwxrwx 1 root root8 Mar 28 11:08 hello_world.aux*-rwxrwxrwx 1 root root2408 Mar 28 11:08 hello_world.log*-rwxrwxrwx 1 root root 11916 Mar 28 11:08 hello_world.pdf*-rwxrwxrwx 1 1000 100069 Mar 28 04:43 hello_world.tex*运行完成后我们在目录中看到了几个新生成的文件,如果用root改成777的权限,那么在本地的非root帐号就可以对其进行编辑,否则就只能查看 。我们可以在本地打开这个pdf文件看看:
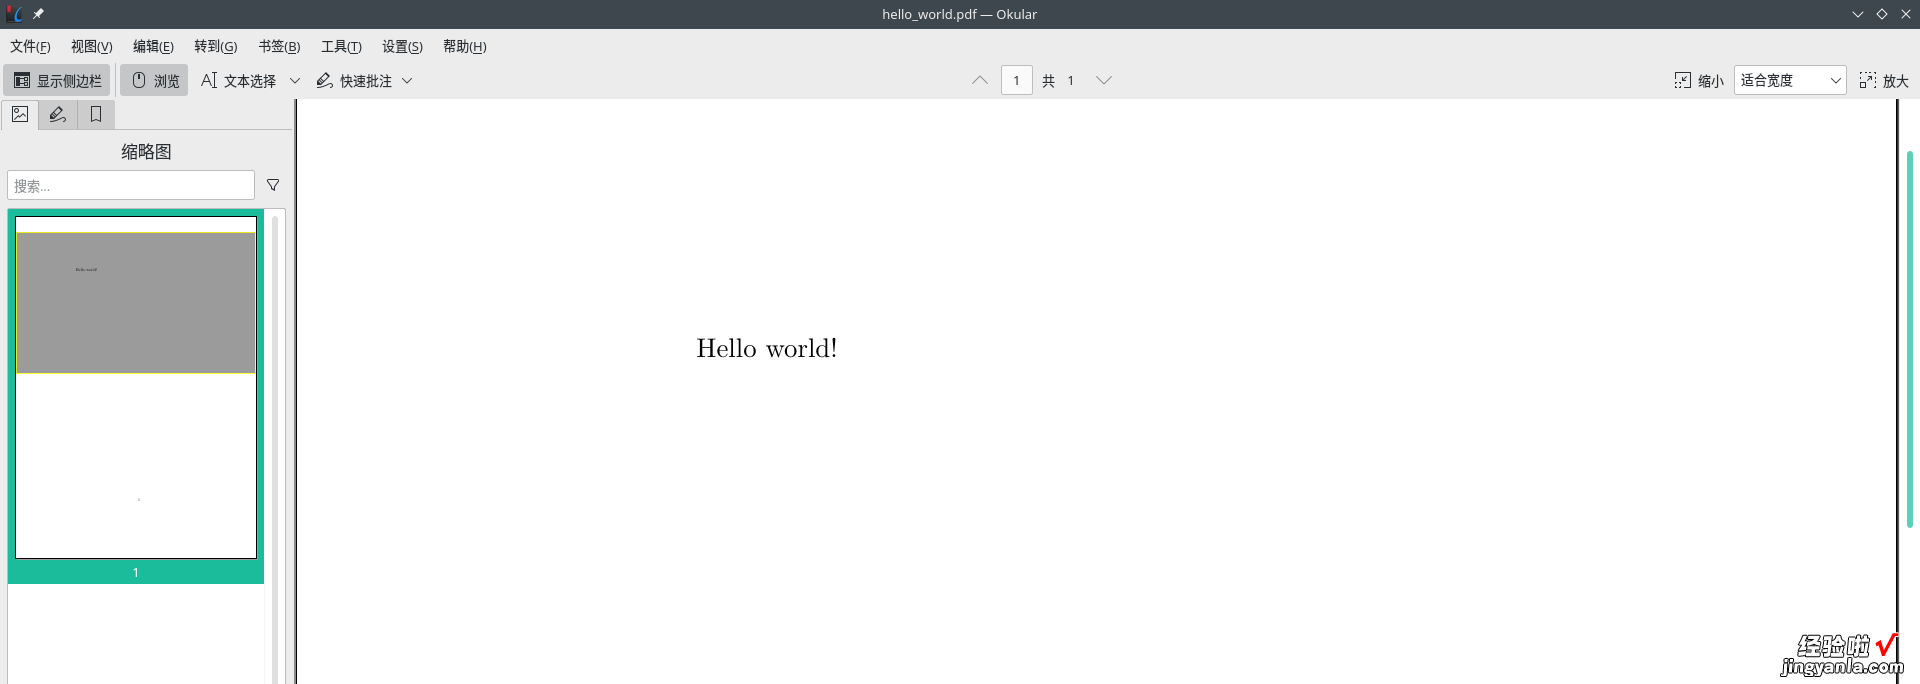
可以看到这个pdf文件生成成功 。
测试公式
上面hello world的案例比较简单,让我们来测试一下最常用的数学公式是否有问题:[dechin@dechin-manjaro tex]$ cat equation_test.tex documentclass{article}begin{document}Hello world!begin{equation}e^{iHt}left|psiright>end{equation}end{document}类似于上一章节的 , 我们也需要进入到容器的内部执行相关的指令,最后获得如下所示的一个pdf文件:
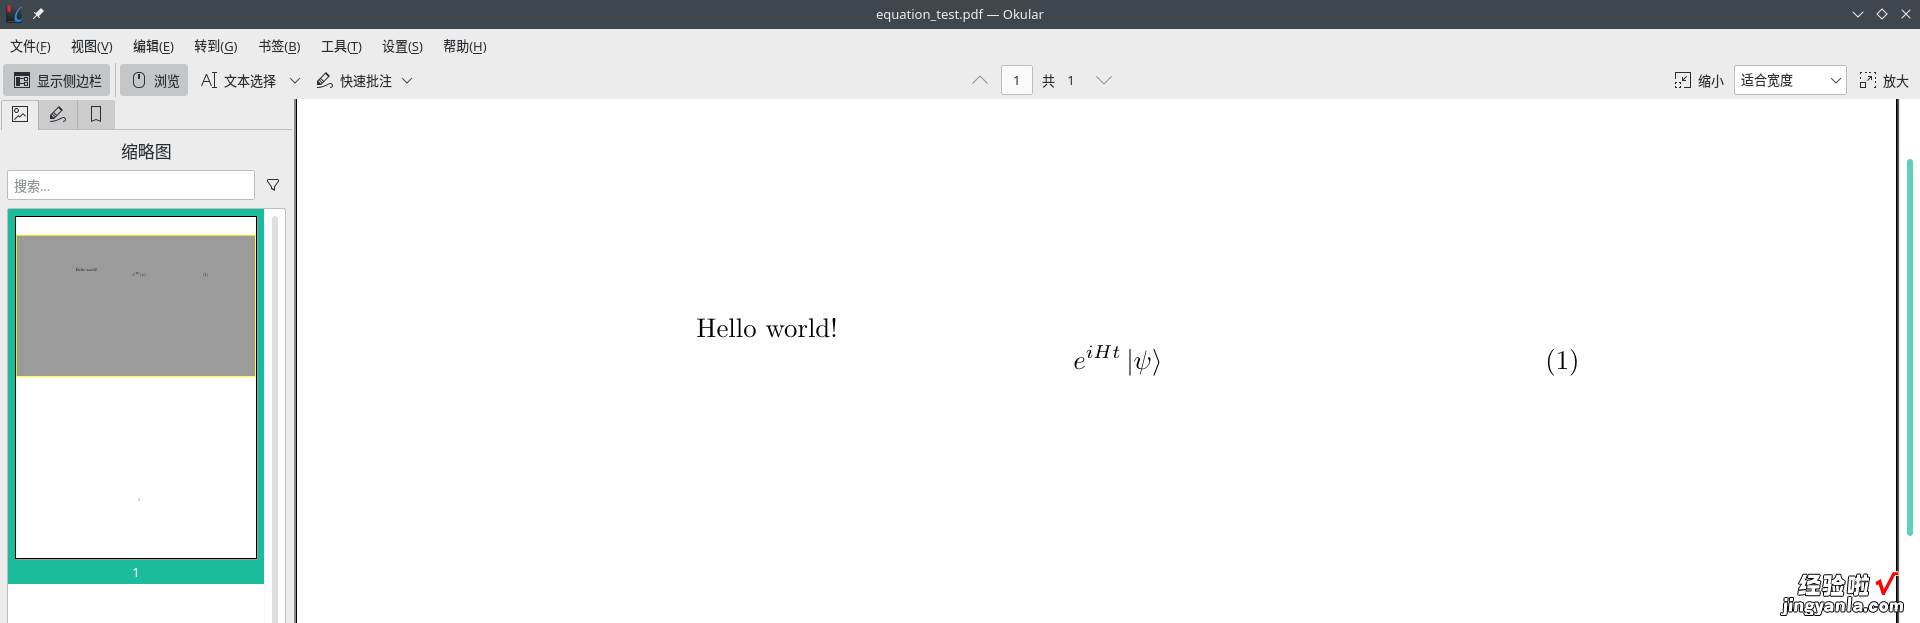
我们可以看到公式显示也是正常的 。
量子线路图
最后我们测试一个比较难的,在前面写过一篇关于用ProjectQ生成Latex格式的量子线路图的博客,其中生成了如下所示的一个tex文件:【配置Docker的pdflatex环境】
[dechin@dechin-manjaro quantum-circuit]$ cat circuit.tex documentclass{standalone}usepackage[margin=1in]{geometry}usepackage[hang,small,bf]{caption}usepackage{tikz}usepackage{braket}usetikzlibrary{backgrounds,shadows.blur,fit,decorations.pathreplacing,shapes}begin{document}begin{tikzpicture}[scale=0.8, transform shape]tikzstyle{basicshadow}=[blur shadow={shadow blur steps=8, shadow xshift=0.7pt, shadow yshift=-0.7pt, shadow scale=1.02}]tikzstyle{basic}=[draw,fill=white,basicshadow]tikzstyle{operator}=[basic,minimum size=1.5em]tikzstyle{phase}=[fill=black,shape=circle,minimum size=0.1cm,inner sep=0pt,outer sep=0pt,draw=black]tikzstyle{none}=[inner sep=0pt,outer sep=-.5pt,minimum height=0.5cm 1pt]tikzstyle{measure}=[operator,inner sep=0pt,minimum height=0.5cm, minimum width=0.75cm]tikzstyle{xstyle}=[circle,basic,minimum height=0.35cm,minimum width=0.35cm,inner sep=-1pt,very thin]tikzset{shadowed/.style={preaction={transform canvas={shift={(0.5pt,-0.5pt)}}, draw=gray, opacity=0.4}},}tikzstyle{swapstyle}=[inner sep=-1pt, outer sep=-1pt, minimum width=0pt]tikzstyle{edgestyle}=[very thin]node[none] (line0_gate0) at (0.1,-0) {$Ket{0}$};node[none] (line0_gate1) at (0.5,-0) {};node[none,minimum height=0.5cm,outer sep=0] (line0_gate2) at (0.75,-0) {};node[none] (line0_gate3) at (1.0,-0) {};draw[operator,edgestyle,outer sep=0.5cm] ([yshift=0.25cm]line0_gate1) rectangle ([yshift=-0.25cm]line0_gate3) node[pos=.5] {H};draw (line0_gate0) edge[edgestyle] (line0_gate1);node[none] (line1_gate0) at (0.1,-1) {$Ket{0}$};node[none] (line1_gate1) at (0.5,-1) {};node[none,minimum height=0.5cm,outer sep=0] (line1_gate2) at (0.75,-1) {};node[none] (line1_gate3) at (1.0,-1) {};draw[operator,edgestyle,outer sep=0.5cm] ([yshift=0.25cm]line1_gate1) rectangle ([yshift=-0.25cm]line1_gate3) node[pos=.5] {H};draw (line1_gate0) edge[edgestyle] (line1_gate1);node[none] (line2_gate0) at (0.1,-2) {$Ket{0}$};node[none] (line2_gate1) at (0.5,-2) {};node[none,minimum height=0.5cm,outer sep=0] (line2_gate2) at (0.75,-2) {};node[none] (line2_gate3) at (1.0,-2) {};draw[operator,edgestyle,outer sep=0.5cm] ([yshift=0.25cm]line2_gate1) rectangle ([yshift=-0.25cm]line2_gate3) node[pos=.5] {H};draw (line2_gate0) edge[edgestyle] (line2_gate1);node[xstyle] (line1_gate4) at (1.4000000000000001,-1) {};draw[edgestyle] (line1_gate4.north)--(line1_gate4.south);draw[edgestyle] (line1_gate4.west)--(line1_gate4.east);node[phase] (line2_gate4) at (1.4000000000000001,-2) {};draw (line2_gate4) edge[edgestyle] (line1_gate4);draw (line1_gate3) edge[edgestyle] (line1_gate4);draw (line2_gate3) edge[edgestyle] (line2_gate4);node[xstyle] (line0_gate4) at (1.9500000000000002,-0) {};draw[edgestyle] (line0_gate4.north)--(line0_gate4.south);draw[edgestyle] (line0_gate4.west)--(line0_gate4.east);node[phase] (line1_gate5) at (1.9500000000000002,-1) {};draw (line1_gate5) edge[edgestyle] (line0_gate4);draw (line0_gate3) edge[edgestyle] (line0_gate4);draw (line1_gate4) edge[edgestyle] (line1_gate5);node[measure,edgestyle] (line0_gate5) at (2.6000000000000005,-0) {};draw[edgestyle] ([yshift=-0.18cm,xshift=0.07500000000000001cm]line0_gate5.west) to [out=60,in=180] ([yshift=0.035cm]line0_gate5.center) to [out=0, in=120] ([yshift=-0.18cm,xshift=-0.07500000000000001cm]line0_gate5.east);draw[edgestyle] ([yshift=-0.18cm]line0_gate5.center) to ([yshift=-0.07500000000000001cm,xshift=-0.18cm]line0_gate5.north east);draw (line0_gate4) edge[edgestyle] (line0_gate5);node[measure,edgestyle] (line1_gate6) at (2.6000000000000005,-1) {};draw[edgestyle] ([yshift=-0.18cm,xshift=0.07500000000000001cm]line1_gate6.west) to [out=60,in=180] ([yshift=0.035cm]line1_gate6.center) to [out=0, in=120] ([yshift=-0.18cm,xshift=-0.07500000000000001cm]line1_gate6.east);draw[edgestyle] ([yshift=-0.18cm]line1_gate6.center) to ([yshift=-0.07500000000000001cm,xshift=-0.18cm]line1_gate6.north east);draw (line1_gate5) edge[edgestyle] (line1_gate6);node[measure,edgestyle] (line2_gate5) at (2.0500000000000003,-2) {};draw[edgestyle] ([yshift=-0.18cm,xshift=0.07500000000000001cm]line2_gate5.west) to [out=60,in=180] ([yshift=0.035cm]line2_gate5.center) to [out=0, in=120] ([yshift=-0.18cm,xshift=-0.07500000000000001cm]line2_gate5.east);draw[edgestyle] ([yshift=-0.18cm]line2_gate5.center) to ([yshift=-0.07500000000000001cm,xshift=-0.18cm]line2_gate5.north east);draw (line2_gate4) edge[edgestyle] (line2_gate5);end{tikzpicture}end{document}这个文件不仅结构复杂,对周边所依赖的tex文件其实也不少,此前在其他平台(Win10)测试这个tex文件的编译的时候,都需要手动的去下载很多的依赖文件,然后放到同一个文件夹下才能正常运行和使用 。这里我们直接运行,发现也可以生成这个pdf文件:
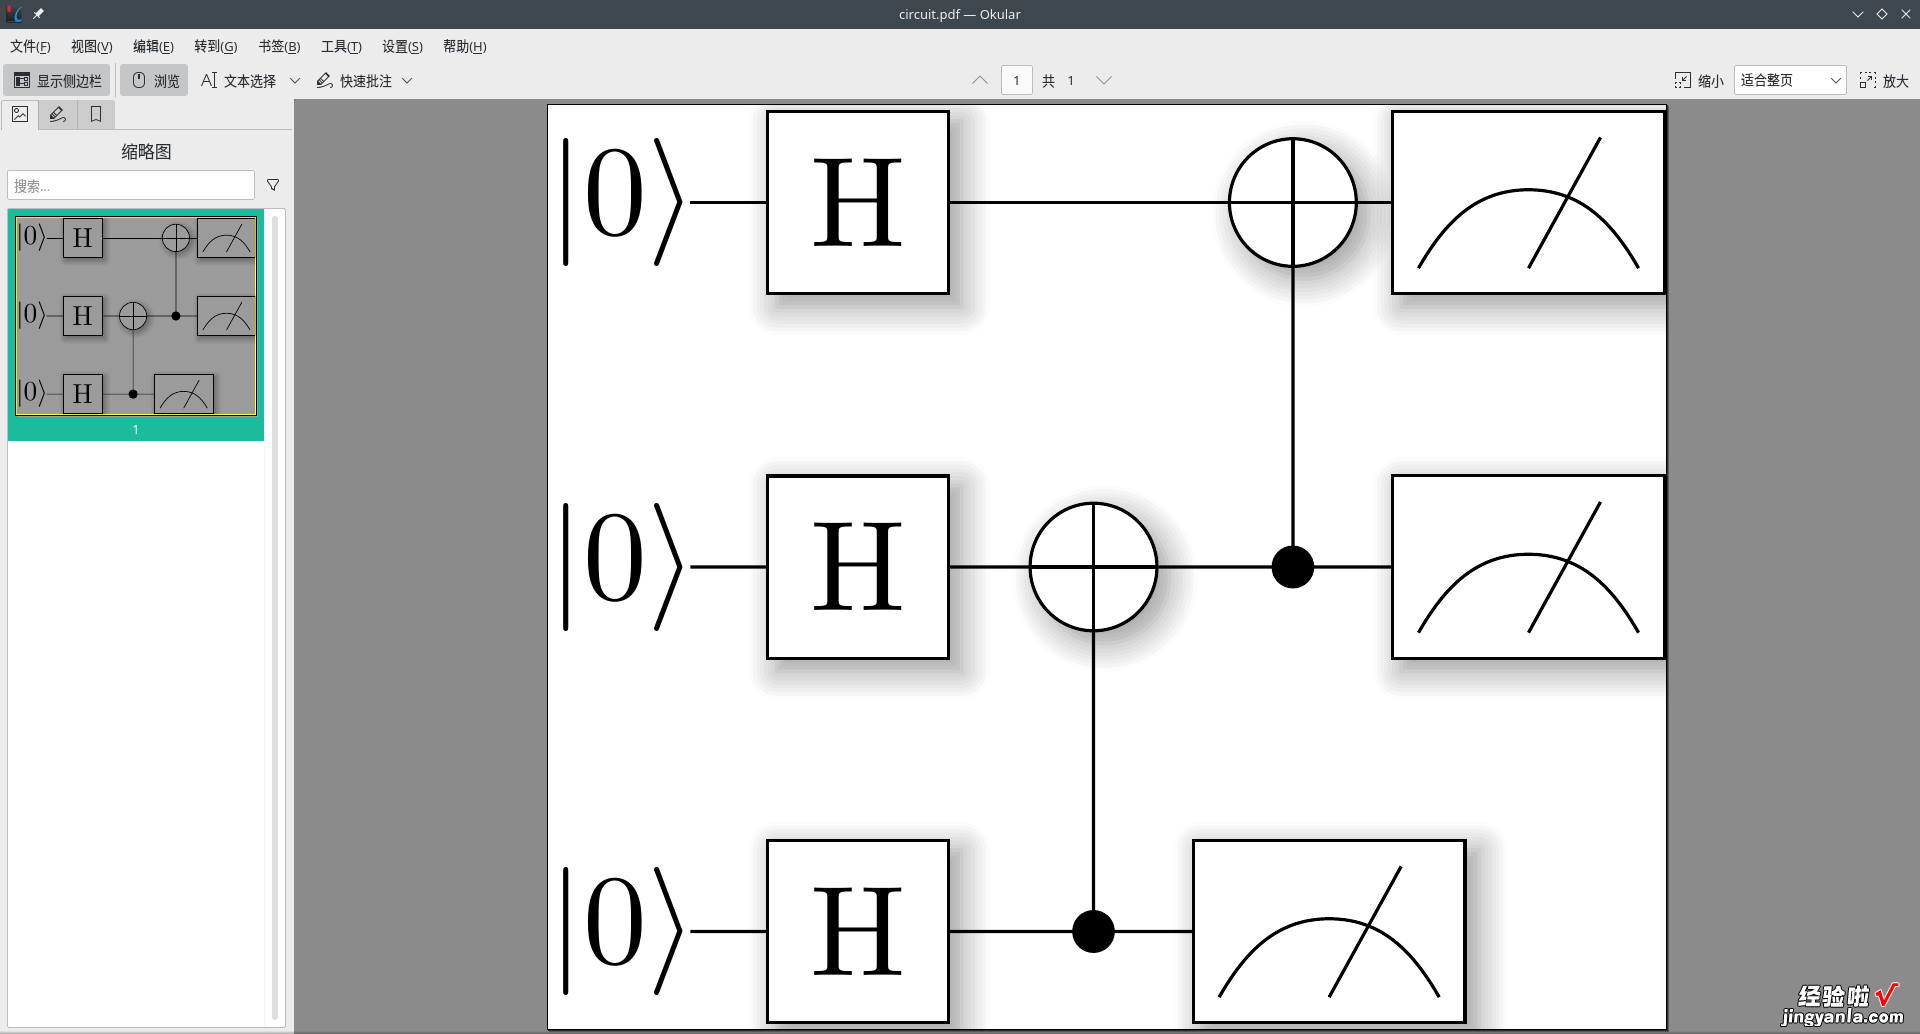
说明环境里面确实已经包含了很多必备的工具 , 跟overleaf的环境应该是比较类似的,使得我们可以在本地非常人性化的、轻便的可以编译tex文件 。
总结概要
为了在本地构建一个可用性强、易于部署的环境,我们选择了放弃直接安装pdflatex的方案,以及线上的overleaf的方案 。这些方案各有利弊,但是综合起来看,对于个人使用的环境而言 , 还是在本地使用docker镜像直接部署一个tex编译环境是最方便、最人性化的 。版权声明
本文首发链接为:https://www.cnblogs.com/dechinphy/p/pdflatex.html作者ID:DechinPhy
更多原著文章请参考:https://www.cnblogs.com/dechinphy/
参考链接
- https://www.cnblogs.com/dechinphy/p/circuit.html